We received the manual in a timely manner and it was exactly what we were expecting. Excellent replacement for original Service Manual.
All schematics are very legible. We are really satisfied.
We received the manual in a timely manner and it was exactly what we were expecting. Excellent replacement for original Service Manual.
All schematics are very legible. We are really satisfied.
We received the manual in a timely manner and it was exactly what we were expecting. Excellent replacement for original Service Manual.
All schematics are very legible. We are really satisfied.
We received the manual in a timely manner and it was exactly what we were expecting. Excellent replacement for original Service Manual.
All schematics are very legible. We are really satisfied.
Fast delivery and good quality manual.
Very easily downloadable from a given url.
Will be pleased to buy again from this seller.
Text excerpt from page 17 (click to view)
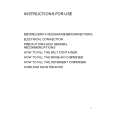
5. To remove control panel parts. (1) Remove the screw which secure the control panel, push up two snap fits and draw forward the control panel assembly.
w q 6 7 0 r e 9
t
3
8
5 1
2
4
(2) (3) (4) (5) (6) (7) (8) (9) (10) (11) (12)
Remove the door open lever ¤ºfrom the control panel ¤� . Remove two screws ¤ıwhich secure the timer assembly ¤ . Remove the timer assembly ¤ . Pull out the knob ¤ from the timer assembly ¤ . Pull out the timer couple ¤ from the timer assembly ¤ . Remove the screw ¤ pull out the switch micro ¤ . Remove the screw ¤æ which secure the V.P.C. coupler ¤ . Pull out the V.P.C coupler ¤ and V.P.C knob ¤� from the control panel ¤� . Remove the screw ¤ pull out the switch micro ¤ . Remove the door open button ¤ and button spring ¤� from the control panel ¤� . Reverse the above steps for reassembly.